Destination Options for a Scheduled Report
The destination options for a scheduled report are:
| • | Default Enterprise Location |
| • | BI Inbox |
| • |
| • | FTP Server |
| • | SFTP Server |
| • | File System |
Note:The most common destinations are BI Inbox and Email.
The scheduled job will run on the Output File Repository Server (FRS). You do not need to set additional options for this destination. Historical instances are saved to the default Enterprise server but not to any other destination.
Sends the object to a user's BI Inbox.
Setting the Destination to “BI Inbox”
Note:You must know the Personnel ID of the recipient to use this destination.
To set the destination to “BI Inbox”
| 1. | In the Destinations drop-down menu, select BI Inbox. |
The corresponding options for BI Inbox are displayed.
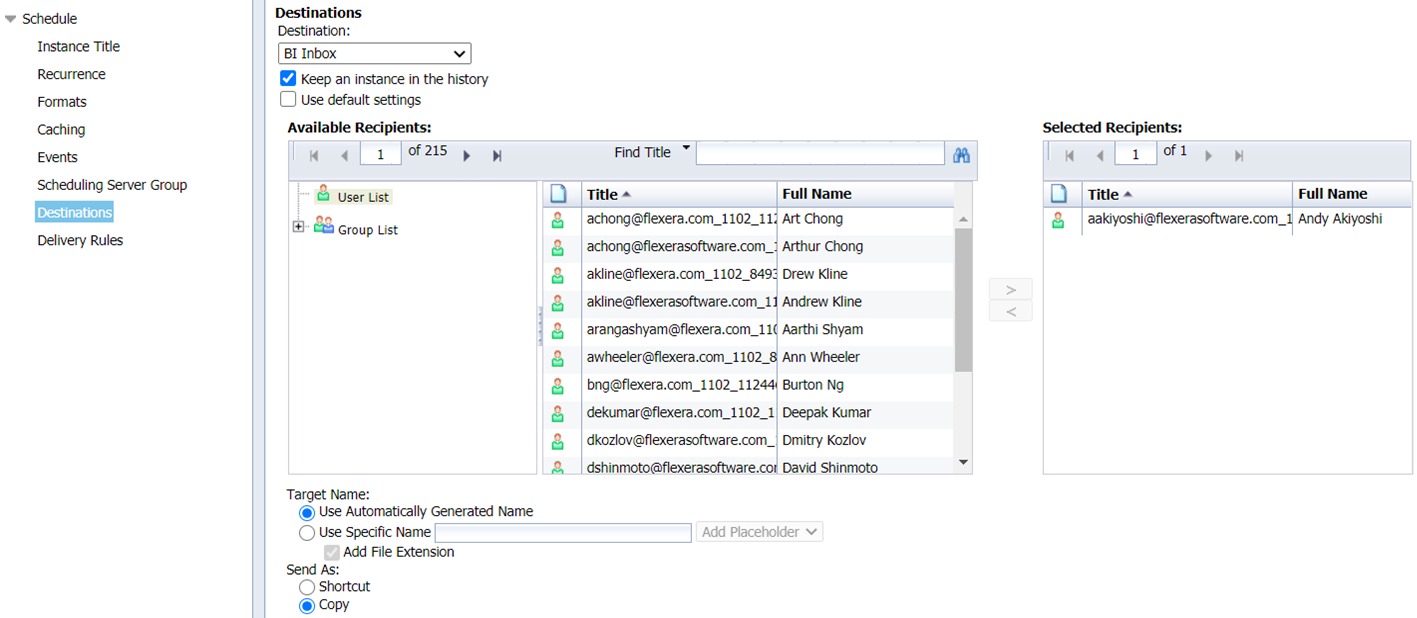
| 2. | Optionally, select the following check boxes: |
| • | Keep an instance in the history—Saves a copy of the instance in the history. |
| • | Use default settings—The report runs as scheduled but is not sent to any recipients. |
If you want to select the recipients, leave this option unselected and specify the intended recipients using the options in Available Recipients (see below).
| 3. | In the Available Recipients section, you can manually find the recipients or search recipients by using the search function. |
Note:To search the recipients, use the Personnel ID.
| 4. | Select the recipients' email ID and click the Move icon (>) to move the recipients to the Selected Recipients section. |
| 5. | Select an option for Target Name. |
Note:By default, the Use Automatically Generated Name option is selected.
| 6. | Under Send As, accept the default option (Copy). |
Note:If you want to create a shortcut to the object, use Shortcut instead.
| 7. | Click Schedule. |
The report's History screen is displayed.
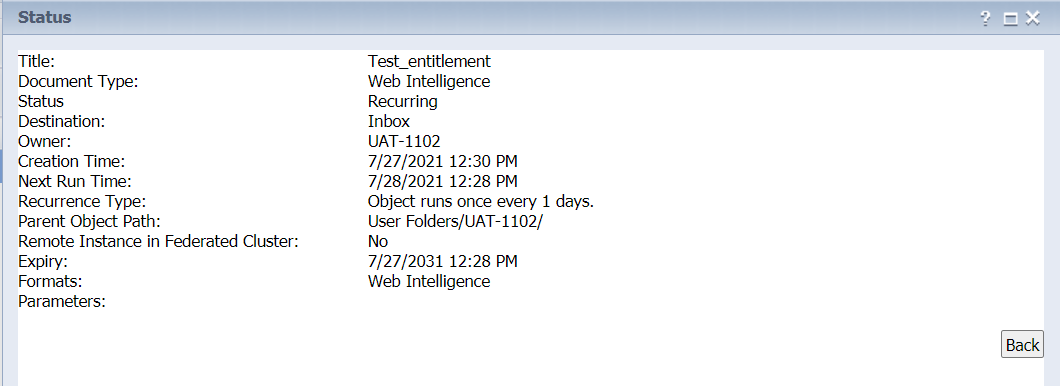
| 8. | Click Running/Recurring. The report's status window is displayed. |
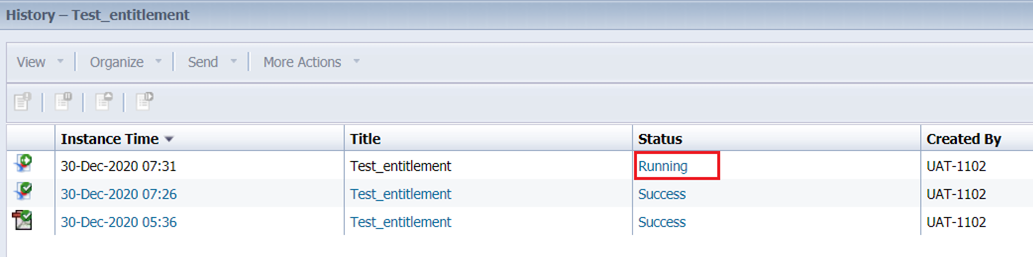
| 9. | The defined Schedule is listed in the Status screen. |
Sends the object to a user's BI Inbox.
Sends the object to a user's email address.
Setting the Destination to “Email”
To set the Destination to “Email”
| 1. | In the Destinations drop-down menu, select Email. |
The corresponding options for Email are displayed.
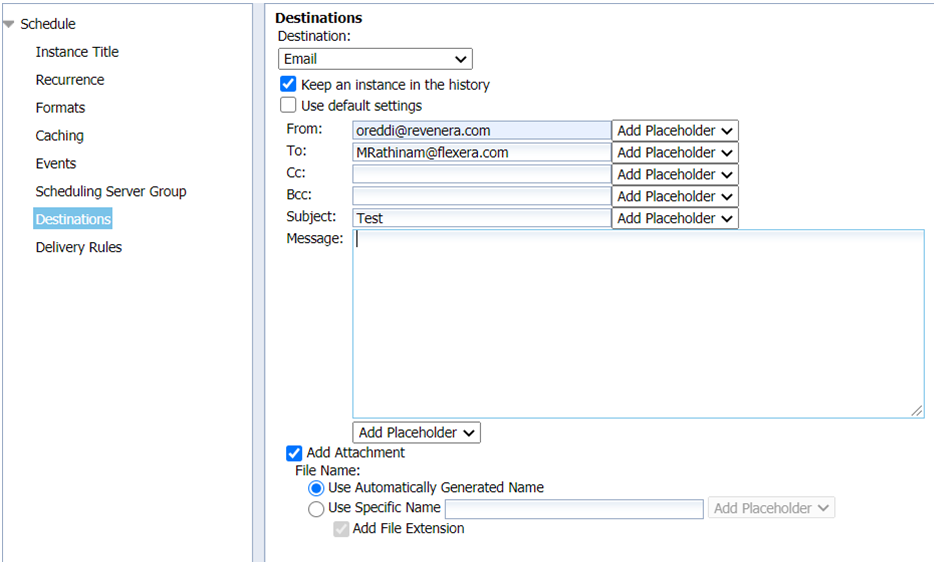
| 2. | Optionally, select the following check boxes: |
| • | Keep an instance in the history—Saves a copy of the instance in the history. |
| • | Use default settings—The report runs as scheduled but is not sent to any recipients. |
If you want to select the recipients, leave this option unselected and specify the intended recipients using the options below.
| 3. | Enter your email address in the From field and recipient's email address in the To field, and add email addresses in Cc (optional), and Bcc (optional) fields. |
Important:If you leave the From field blank, the object will be sent from the login of the user who is currently logged on. Using a From email other than one from the flexnetoperations.com domain may result in email being flagged as spam.
| 4. | (Optional) Enter a subject and message for the email body. |
| 5. | If you want to include an attachment, select Add Attachment. |
Under File Name, it is recommended that you select Use Specific Name and add the placeholder “Title”. Otherwise, an auto-generated string of characters will be appended to the file name.
| 6. | Click Schedule. |
The report's History screen is displayed.
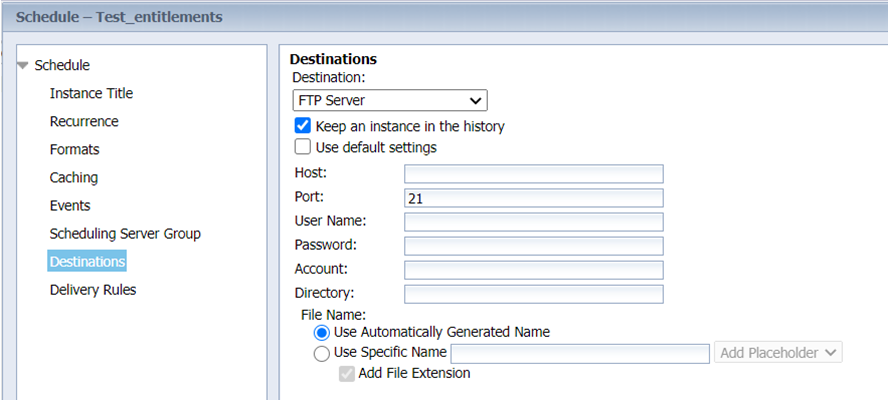
Sends the object to an FTP (File Transfer Protocol) server location:
|
Option |
Description |
||||||
|
Destination |
FTP server. |
||||||
|
Keep an instance in the history |
Saves a copy of this instance in the document's history. This option in selected by default. If you want the BI platform to automatically delete the instance from the Output FRS to minimize the number of instances on the server, clear the Keep an instance in the history check box.
|
||||||
|
Use default settings |
Uses the default Adaptive Job Server values for FTP Servers.
|
||||||
|
Host |
Enter the IP address of the FTP server host computer where you want to send the instance. |
||||||
|
Port |
Enter the port of the FTP server where you want to send the instance. The default is 21. |
||||||
|
User Name |
Enter a user name with access rights to upload the object to the FTP server. |
||||||
|
Password |
Enter the password required to access the FTP server. |
||||||
|
Account |
Enter the account required to access the FTP server. The account is part of the standard FTP protocol but is rarely implemented. Enter an account only if your FTP server requires it. |
||||||
|
Directory |
Enter the path to the FTP directory where you want to send the instance. |
||||||
|
File Name |
To use a system-generated file name for the instance, select Use Automatically Generated Name.
|
SFTP Destination support is one of the more interesting new features introduced with the recently released SAP BusinessObjects BI Platform 4.1 Support Pack 6.
SFTP protocol is a computing network protocol for accessing and managing files on remote file systems, similar to FTP. SFTP encrypt commands and data both, preventing passwords and sensitive information from being transmitted in the clear over a network. The advantages of having SFTP is that it allows secure transmission of data using Fingerprint authentication.
Steps for SFTP scheduling
| 1. | The destination has to be enabled in CMC on the Adaptive Job Server. Enter the details of the SFTP Server, along with the SHA FingerPrint of the server. Contact your administrator to enable FTP/SFTP in CMC. |
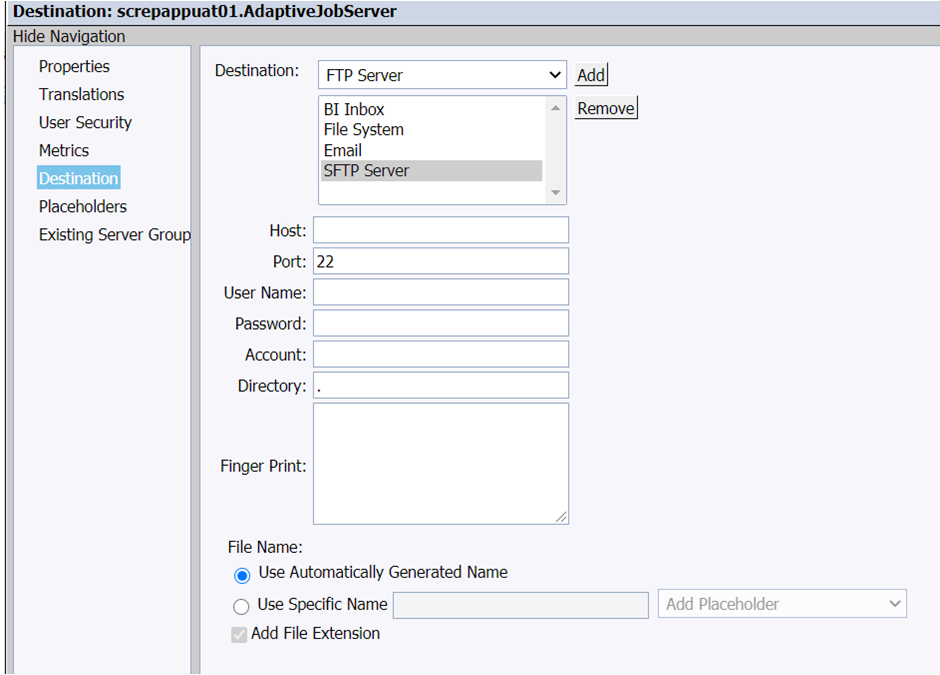
| 2. | Enable the SFTP Server in CMC. Enter the SFTP Server details, along with the Fingerprint Value |
| • | Host—IP address of SFTP Server. |
| • | Port—Port of SFTP Server (the standard SFTP port is 22). |
| • | Username—Username to access SFTP Server |
| • | Password—Password to access SFTP Server. |
| • | Account—Account needed to access SFTP Server. |
| • | Directory—Directory location in SFTP Server where the document is to be delivered. |
| • | File Name—Select Use Automatically Generated Name or Use Specific Name. |
| • | Fingerprint—Host key fingerprint of the SFTP server and save the details. |
The File System destination type is not supported in this implementation.